Categories
Programming

Unified API: 64-bit support for Xamarin.iOS

There’s a deadline coming up for all iOS developers. Starting February 1, 2015, all apps and app updates submitted to the iOS app store must be built against the iOS 8 SDK and must include 64-bit support. While this is more of a routine update procedure for Objective-C developers, it has deeper implications for Xamarin.iOS developers.

The original design of the MonoTouch API chose to use some of the builtin .NET types, such as System.Int32 (int), System.Single (float) and RectangleF. Unfortunately, these types are all either 32-bit types or consist of 32-bit types. What is needed now, though, is a type that is 32-bit on 32-bit platforms and 64-bit on 64-bit platforms.

For this reason, Xamarin introduced a breaking change that will affect all Xamarin.iOS developers. The good news is that they are using the opportunity to fix a few issues with the old API. If you’re interested in all the changes, there is an Evolve session by Miguel de Icaza available.

The new Unified API comes as an assembly called Xamarin.iOS.dll instead of the old monotouch.dll. It replaces the old numeric types as follows:

old new
System.Int32 (int) System.nint
System.UInt32 (uint) System.nuint
System.Single (float) System.nfloat
System.Drawing.PointF CoreGraphics.CGPoint
System.Drawing.SizeF CoreGraphics.CGSize
System.Drawing.RectangleF CoreGraphics.CGRect

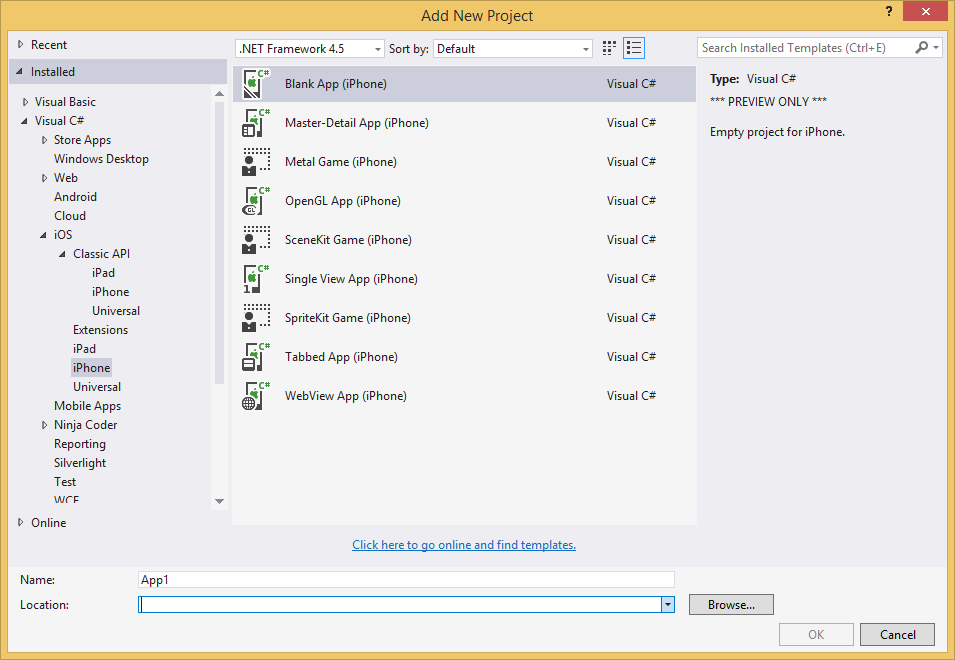
Projects using the new Unified API need to use a new project type.

Unified API

From within the new project types, you can’t reference Classic API projects.

The word “Unified” in Unified API comes from Xamarin’s attempt to facilitate code sharing for iOS and Mac projects. This is also the reason the namespace MonoTouch was dropped entirely, making it possible to share some code between the two platforms that needed to have platform-specific implementations previously, e.g, through Shared Projects.

Updating your existing projects from Classic API to Unified API can be done by hand or semi-automated. Xamarin has published instructions for the manual steps as well as the automatic update script or update feature integrated in Xamarin Studio.

I’ve updated the iOS code in MvvmCross to the Unified API. Here are some of the things I stumbled across while porting the code.

  • A few method names were fixed (e.g., UINavigationController.PopViewControllerAnimated() is now UINavigationController.PopViewController(), CGContext.SetRGBFillColor() is now CGContext.SetFillColor(), NetworkReachability.SetCallback() is now NetworkReachability.SetNotification()).
  • Some methods with callbacks were replaced with awaitable versions.
  • Some deprecated methods were removed.
  • The new numeric types look like builtin types but don’t behave like builtin numeric types (e.g., they can’t be const, you can’t use System.Math.Max() on them, etc.).
  • MonoTouch.Foundation.NSAction seems to have been dropped in favor of System.Action.

Xamarin’s current stable channel contains a preview for the Unified API. The final version is expected to hit the alpha and beta channels by early December 2014. Every existing Xamarin.iOS project will need to be updated if submitted to the App Store after February 1, 2015. It’s time to start looking at updating your projects.

Update January 18, 2015:

  • The iOS Unified API is now available on the stable channel.
  • In the meantime, Apple has further detailed its announcement regarding the submission deadline: The February 1 deadline only applies for new apps. Updates for existing apps can still be submitted as 32-bit before June 1, 2015.
  • There have been breaking changes between Xamarin’s prerelease version Xamarin.iOS 8.4 and the final version 8.6.
  • Xamarin has provided the class System.NMath for arithmetic operations on the new types nint, nuint, nfloat.
  • To submit to the app store, the app will need to also be built against for the ARM64 architecture. This can currently only be set using Xamarin Studio or directly in the .csproj file for Visual Studio users.
Categories
Programming

async/await part 2: Understanding the await keyword

In part 1 of this series we looked at the async keyword. async without await is possible (though not very useful) but await without async not. If you want to use await inside a method it must be marked as async.

The await keyword

Here is an example of a method using await:

Apart from the keywords async and await and the funny return value this looks just as you would write a synchronous method: Download a web page, then apply a regular expression to its contents to see if it matches.

And that is just the point. Although this method is asynchronous, it looks and feels like a synchronous method. But unlike its counterpart, the async method won’t block the caller until it is finished, won’t stay stuck in your mouse click event handler and, most importantly, won’t freeze the rest of your application.

How does does it work?

What happens when this method is called is that it executes just like any other method up to the point where the first await is encountered. At that point, the method returns to the caller with a Task (let’s call it method task) that contains information about the state of its work. As soon as the Task returned by GetStringAsync() completes the remainder of the method is executed. Note that all local variables are preserved and are available just as in a standard non-async method. When the method is finished with completing the remainder of its work (applying the regular expression) it will magically set the method task’s Result property to the value passed to the return statement and mark the Task as completed.

Typically, calls to async methods will be called and awaited by other async methods so the caller of our DoesWebContentMatchPatternAsync() method will not have to do anything special to receive this result. All it takes is writing await in front of the method call.

This will generate a compiler error if that method is not async.

How do I introduce await?

In practice, you’ll see this happen a lot when asyncifying existing code. The procedure is always the same:

  1. Add an await inside a method.
  2. Realize it doesn’t compile anymore because it is not async.
  3. Add async to the method’s declaration.
    1. If the return type was void, change it to Task.
    2. If the return type was of any type T, change it to Task<T>.
  4. Add the Async suffix to your method name using your favorite refactoring tool.
  5. Repeat from step 1 for the calling method.

This typically leads to async/await creeping through your entire codebase after some time but will leave a good feeling of accomplishment afterwards.

But what about exceptions?

But the magic of await doesn’t stop there. Another tedious task of asynchronous programming is catching and handling errors that occur in code running in the background. async/await handles this problem very elegantly by propagating exceptions through the Task‘s IsFaulted and Exception properties. What this means is that you can write exception handling code just as you would with synchronous code.

If you don’t catch the exception it will propagate to the calling method, just like with synchronous code. As long a your code is async/await all the way you won’t have to do anything differently.

Background work and the UI thread

The last piece of magic comes in the form of context synchronization. Another common pitfall in asynchronous programming comes from the fact that most UI technologies rely on a single UI thread to handle all modifications of the UI. Modifying a UI element from a different thread will typically lead to an exception being thrown. Let’s look at another piece of code using our method from above:

The code shows an event handler for a button click in a WPF code-behind (so not the place you would typically implement this functionality). The line assigning a new value to resultBox.Text is a line that has to be called from the UI thread in WPF. However, there is no code marshaling the call back to the UI context. This is because the default behavior of async/await is to try and execute the remainder of the code following an await call back into the original context for you.

This behavior is typically only needed for UI code and should be disabled for all other code as it adds overhead and may cause deadlocks. Disabling is achieved by calling ConfigureAwait(false) on the Task to be awaited:

This tells the compiler that it is OK to execute the remainder of the method (i.e., everything following the call to await) in the same context as the work done in the awaited call.

Give it a shot!

If you’re already on .NET 4.5 I suggest you give async/await a try. It will change the way you look at asynchronous programming.

Categories
Programming

async/await part 1: Understanding the async keyword

By far my favorite feature of .NET 4.5 is async/await, or, as Microsoft call it, the Task-based Asynchronous Pattern (TAP). It is something I didn’t know I was missing until I saw a recording of Anders Hejlsberg’s Build talk on the subject. Shortly after this, I had a highly asynchronous C++ embedded project that lasted for over a year where I felt miserable building state machine after state machine to handle the inherent problem of all asynchronous programs: What do you do after your asynchronous operation completes?

This blog series is aimed at C# programmers new to async/await. A general understanding of the Task class introduced with .NET 4.0 is expected. In this first part, I’ll explain the async in async/await.

What is async?

The async keyword can be used to decorate a method or lambda expression.

It is important to note that async is not a part of the method signature, so if you are implementing an interface or overriding a virtual or abstract method you have a choice of whether to use async or not.

Return types

An async method may only return void, Task or Task<T> for any concrete type T.

void as a return type should be avoided where possible and is generally only needed in event handlers, making the method a fire-and-forget method where the caller has no way of knowing when the call finished or failed.

If you write a method returning Task or Task<T> you should generally follow the convention of using the suffix Async in your method name to indicate that the method can be awaited (regardless of whether you method’s implementation uses async or not).

Task should be returned for methods that would, if they were synchronous methods, return void. Task<T> should be returned for methods that would otherwise return some type T (i.e., anything not void). Think of the Task as the object the caller can use to keep track of what ever happened to that asynchronous method he triggered.

What effect does async have?

Writing async will do two things to your method or lambda:

  1. It will allow you to write await in your method (see my next blog post in this series).
  2. If your return type is not void the compiler will automagically convert your return statement (or the missing return statement at the end of your method) into a Task<T> or Task.

For a method that does not contain any await calls, this means a completed Task will be returned without the need to explicitly specify this. For the above example this means it will behave exactly like this non-async version of it:

For a method that does contain an await in the executed path, the method will return a Task object that will turn to the IsCompleted state when the last awaited call has completed and the synchronous code following it (if any) has finished executing. (For more on this, read my next blog post in this series about the await keyword.)

Do I need async?

Methods containing only one await statement as the very last instruction in the method may generally be written without the async keyword. For example, the method

is equivalent to

Even though this yields the same result, the method declared as async seems to be the more readable version and has a slight runtime penalty. The other difference here is that if stream.FlushAsync() throws an exception and await is not used FlushTheStreamAsync() will not appear in the exception’s call stack (more on exceptions in the next blog post).

How does that help me?

As mentioned earlier, the returned Task object can be used to examine the state of the asynchronous call (still running? completed? failed? cancelled?). While this is possible using the various methods of the Task class, the easiest way to handle this is through the await keyword handled in the next blog post.

Categories
Programming

DWX14 Follow-up: Introduction to Xamarin and MvvmCross


At this year’s Developer Week in Nürnberg I held a talk on cross-platform development using Xamarin and MvvmCross. I had a lot of fun with the live coding and enjoyed answering the questions.

My slides can be found on Slideshare in English and German. The code from live coding I created with the big help of Ninja Coder is up on GitHub.

Categories
Programming

An in-app status bar for Xamarin.iOS and MvvmCross

For an iPad app for our customer Smart Enterprise Solutions we wanted to display multiple messages to the user. These messages were mainly feedback from a business logic layer that communicated with a backend. The messages should be visible inside the app. Some messages needed to be confirmed by the user while others needed to disappear after a defined timespan.

This final status bar looks like this:

StatusBar

The code is available at https://github.com/lothrop/StatusBar.iOS.

The status bar view is called StatusView. To use StatusView, use auto-layouts to snap it to the left, right and bottom of your screen. StatusView is backed by the ViewModel MessageViewModel. MessageViewModel contains an ObservableCollection<IMessageItem>. You can insert items at any point in the collection, remove items or move items within the collection.

For a usage example, take a look at the MainViewController.cs file.

A big thanks to Smart Enterprise Solutions for letting me publish the code.

Categories
Programming

DWX13 Follow-up: Detecting jumps with Kinect and Reactive Extensions

At Developer Week 2013 I gave a talk (in German) on Reactive Extensions. The slides are online on Slideshare. During the talk, I live-coded a part of a console-based jump and run game that uses Kinect as input. The first task was to detect when the player (the volunteer on stage) jumped. Here’s the code from the demo:

This code contains a lot of simplifications for presentation purposes but it can still be used to explain some Reactive Extension concepts. I’ll walk you through it and also spell out the vars:

This retrieves the single Kinect that is attached to the PC (or throws an exception if there is not exactly one Kinect connected).

This creates an IObservable from the classic .NET event SkeletonFrameReady by telling Rx how to subscribe and unsubscribe from the event.

Interestingly, the class SkeletonFrameReadyEventArgs doesn’t contain any properties at all, just one method public SkeletonFrame OpenSkeletonFrame(); that can be used to access the skeleton data. The SkeletonFrame instance must then be disposed within 1/30 second.

We now have an IObservable that publishes a list of skeletons whenever there are people in front of the Kinect sensor.

This code extracts the joints from the single skeleton if it has a tracked state.

This extracts the average vertical position of the left and right foot. This is a simplification as it would be possible to trick the algorithm by just lifting one foot up twice as high as both feet would need to jump up. To fix this, you could Select() both feet in this statement.

This is the actual jump detection code. The idea is that to have jumped, the player would have to have his feet low, then high and then low again in a short timespan. To analyze this, we’re looking at samples from a time frame of one second. After this, we’ll move forward by 200 milliseconds and analyze again. This magic is provided by the Buffer() extension method. We’ll look for the maximum height of the feet within the time frame and see if the first and last samples are both lower than the maximum minus a hard-coded magic number (for simplification again). If the algorithm matches, the IObservable outputs the string “jumped”, else the string “didn’t jump”.

If you add jumped.Subscribe(Console.WriteLine); at this point you will see a stream of “didn’t jump” interrupted by a few instances of “jumped” whenever the player jumped.

The call to DistinctUntilChanged() will only output the string if it differs from the previously output string. The next line simply filters to only output “jumped” whenever the player jumps.

This line will output the resulting IObservable to the console.

This starts the Kinect sensor.

The presentation was a lot of fun. Thanks again to the volunteer! I’ll be back at Developer Week again this year talking about cross-platform mobile using C#.

Categories
Programming

Animation fun with UIView.AnimateAsync()

Xamarin.iOS 6.4 brought async/await support to iOS devices. Apart from supporting the idiom with the Mono 3.0 compiler, Xamarin also invested into adding awaitable versions of all long-running calls in Apple’s iOS API. One of my favorites is

UIView.AnimateAsync()

taking an Action or lambda to animate asynchronously without blocking the UI thread.

The fun begins when you use this to chain animations. Here’s an example of doing a horizontal shake animation that could be used to indicate an invalid entry: