When using MvvmCross in a cross-platform mobile project you have the choice of four different approaches for creating the iOS user interface. Xamarin.Forms is one of those approaches that can be a good choice for many use cases (even if there is not graphical designer at this point). However, if your view has very specific visual requirements, it may be necessary to create a native view. There are three different ways you can do this:
- Hand-coded: Create all visual elements in code. This approach is more widespread on iOS than on most other popular platforms. It gives you the advantage of having the maximum control possible over your user interface.
- XIB files: XIB files are XML files that describe the visual elements. XIB files are typically not edited by hand but created using Xcode’s Interface Builder. Since Xamarin 4, XIB files can also be visually created and modified in Xamarin Studio or Visual Studio.
- Storyboard files: This is the newest approach. Storyboards are also XML files visually edited with Xcode, Xamarin Studio, or Visual Studio yet they contain not only a single view but a series of views along with the workflow to navigate between these views.
MvvmCross supports all three native approaches.
Hand-coded
This approach obviously produces the most code. It may be challenging for people new to the platform but it saves you the hassle of battling with the UI designers.
XIB files
If you’re already on Xamarin 4 and prefer a visual editor, this is likely the best choice for you. Create a new XIB View Controller file using Xamarin Studio or Visual Studio. The ViewController code will also be created for you. All you need to do for MvvmCross is to change the base class from UIViewController to MvxViewController. In the example, three UI elements were created using the designer and were given the (not so creative) names UiLabel, UiTextField, and UiButton. These elements are then referenced in the data binding code that is common to all three approaches.

Storyboard files
The big advantage of storyboards, the ability to design your screenflow in the designer, does not fit well with MvvmCross’s cross-platform navigation approach. If you define a transition from view A to view B in the designer it will only apply to the iOS platform. It is typically a better idea to move this navigation logic down into the cross-platform code inside your ViewModels. That is why it’s best to use a one-ViewController-per-storyboard approach when using storyboards in MvvmCross.
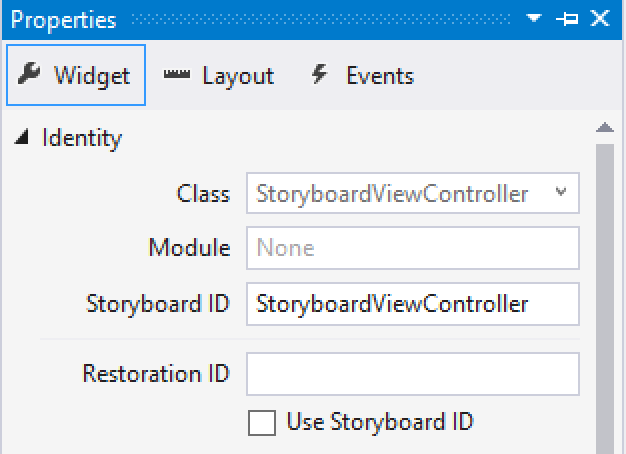
In the editor, you need to set the storyboard ID to the name of your ViewController. As with the XIB approach, change the base class from UIViewController to MvxViewController. Create a constructor taking an IntPtr and passing that on to the base class’s constructor. The last step is to add the [MvxFromStoryboard] attribute to the class.
Summary
The good thing is: You don’t have to make this decision at project start. MvvmCross supports implementing your view with the technology that is best for each view. You only need to ensure you don’t have multiple views for the same ViewModel and the same platform.
I’ve updated the example in the MvvmCross Starter Pack Nuget (starting with 4.0.0-beta8) to use a XIB file instead of the previous hand-coded approach with absolute coordinates (from the auto layout days). That should make it easier for people to get started.
13 replies on “iOS User Interfaces with MvvmCross”
[…] iOS User Interfaces with MvvmCross | Kerry’s Blog – Kerry talks crafting native iOS user interfaces with MvvmCross […]
For the hand coded version, there is a great extension by Stuart called FluentLayouts:
https://github.com/slodge/Cirrious.FluentLayout
so you can do fluent constraint declaration like this:
this.ContentView.AddConstraints(
this.alertTypeImageView.WithSameCenterY(this.ContentView),
this.alertTypeImageView.AtLeftOf(this.ContentView, Values.Margins.Medium),
this.alertTypeImageView.Width().EqualTo(Values.Sizes.BigIconSize.Width),
this.alertTypeImageView.Height().EqualTo(Values.Sizes.BigIconSize.Height),
this.title.ToRightOf(this.alertTypeImageView, Values.Margins.Medium),
this.title.AtTopOf(this.ContentView, Values.Margins.Small),
this.title.ToLeftOf(this.smartDate),
this.smartDate.AtRightOf(this.ContentView, Values.Margins.Medium),
this.smartDate.WithSameCenterY(this.title),
this.eventName.WithSameLeft(this.title),
this.eventName.Below(this.title),
this.eventName.AtRightOf(this.ContentView, Values.Margins.Medium));
Yes, thanks. I was trying not to pull in any new dependencies and would never write it that way in a real app. There’s also EasyLayout by Frank A. Krueger.
Great very informative post!
I’ve got a question regarding hand-coded UI. Can you recommend any good patterns to manage UI code? In your example you put everything inside ViewDidLoad method. Do you also do it in larger projects with complex UI or you have any tricks to achieve ‘clean’ UI code?
We’ve worked out something of our own. It’s a mix of inheritance and helper classes. Perhaps you can find some information on how some people have done that with Swift/Objective-C?
Unfortunately, there’s very little information about this topic. As far as I know, using storyboards or XIB files in bigger projects is sometimes considered as a bad practise. They’re simply hard to maintain due to the problem with merging. Regarding writing UI in code, I think there isn’t any generic pattern. You’re using what suits you best but it would be nice to see how other people are trying to make UI code more maintainable.
The clarity on your submit is awesome, and i will agree with you are a professional on this region. well together with your authorization allow me to get your RSS nourish to keep up to now with coming near publish.
ConstraintHelper by hansmartin.geiser
https://github.com/semiroot/ConstraintHelper
var constraintHelper = new ConstraintHelper(View);
var box1 = new UIView();
var box2 = new UIView();
var box3 = new UIView();
var box4 = new UIView();
var box5 = new UIView();
constraintHelper
.Attach(box1)
.Top().Left().Width(50f).Height(50f)
.Attach(box2)
.BelowOf(box1)
.LeftOf(box1)
.Width(50f).Height(50f)
.Attach(box3)
.BelowOf(box2)
.LeftOf(box2)
.Width(50f).Height(50f)
.Attach(box4)
.BelowOf(box3)
.LeftOf(box3)
.Width(50f).Height(50f)
Kerry, can you shed more light on the setup for storyboard? I am using Xamarin Studio on Mac and trying to understand how to set the storyboard ID. Do I create both a storyboard and a ViewController separately? How do they get hooked together, is it the ID?
You create a storyboard that contains the ViewController. See also this answer on StackOverflow http://stackoverflow.com/questions/22126929/mvvmcross-support-for-xamarin-ios-storyboards on how to match the IDs.
Great articles, thanks for summarising 🙂
Kerry, thanks for the article! What if we have two storyboards for iphone & ipad or more than two? How do we change the storyboard name here [MvxFromStoryboard(“MainStoryboard”)] on top of the class we want to initialize?
See https://twitter.com/cheesebaron/status/1208027137606914048.